
Common Paver Problems and Solutions
Common paver problems can arise over time due to various factors, affecting both the aesthetics and structural integrity of your outdoor surfaces. Paver problems encompass a range of challenges that can emerge over time in outdoor paved areas. These issues can impact both the functionality and visual appeal of the space. From weed growth between paver joints to uneven surfaces and cracked pavers, these problems can stem from factors such as weather, improper installation, and wear. Discoloration and staining can also occur due to exposure to the elements and spills. It’s essential to address these issues promptly to maintain the integrity and aesthetics of your paved surfaces. By understanding the potential pitfalls that can arise and implementing effective solutions, you can ensure that your paver installations remain durable, safe, and visually pleasing for years to come.
Weed Growth and Joint Maintenance
Understanding the Causes of Weed Growth between Pavers
Understanding the causes of weed growth between pavers is essential to effectively combat this persistent issue. Weeds find their way into the smallest of crevices, exploiting gaps between paver joints to establish their root systems. These gaps are often the result of inadequate installation practices, including improper compaction of the base material or the use of insufficient joint sand. Additionally, pavers settling over time or minor shifts due to foot traffic or weather can create open spaces that weeds readily exploit. The presence of organic debris, such as fallen leaves or dirt, can also create fertile ground for weed seeds to take root.
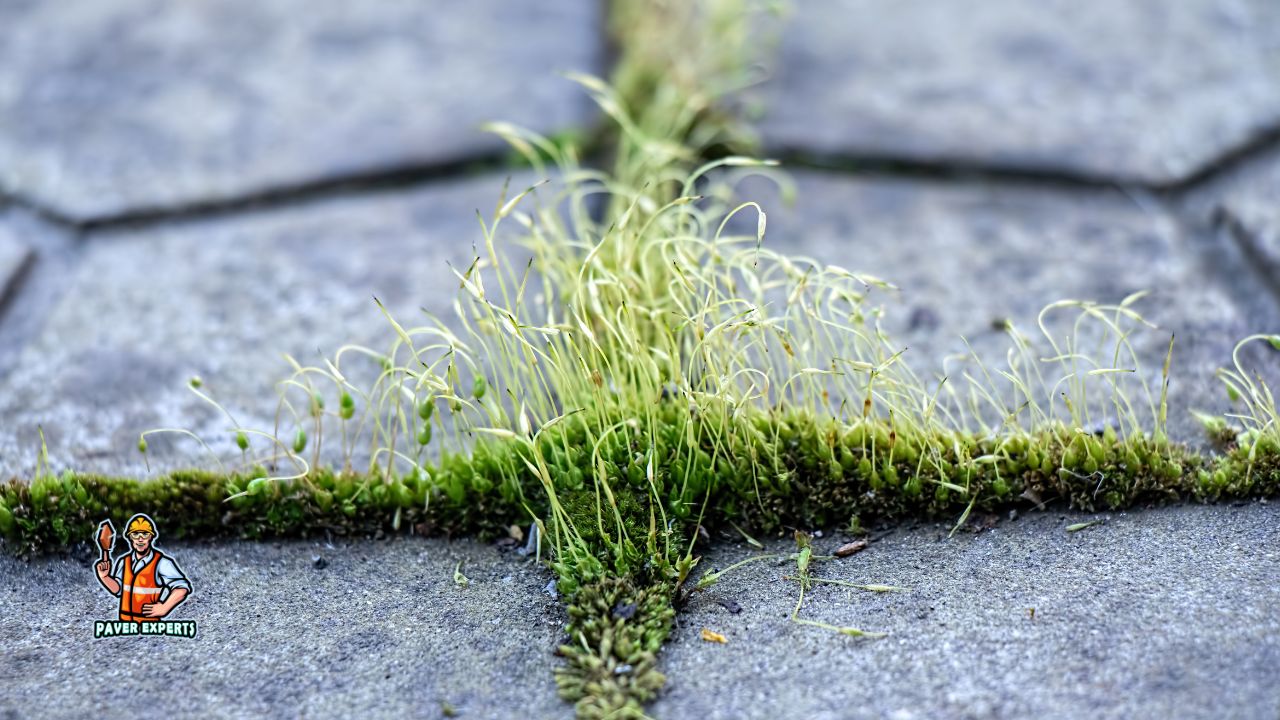
Moisture plays a crucial role in weed proliferation, as water that collects in the joints provides the ideal environment for seed germination and growth. Moreover, sunlight exposure fuels the photosynthesis process, allowing weeds to thrive even in seemingly inhospitable conditions.
Frequently Asked Questions
Pavers can shift due to improper installation or insufficient base preparation. To address this, consider reinstalling the pavers with proper compacted base material, edge restraints, and joint sand to prevent movement.
Weeds can sprout through gaps in pavers when there’s inadequate joint sand or a lack of weed barrier. To prevent this, ensure proper joint sand application and consider using a geotextile fabric beneath the pavers to inhibit weed growth.
Paver fading can occur due to exposure to sunlight and weather. To restore color, clean the pavers thoroughly and apply a paver sealer. This will enhance their appearance and provide UV protection.
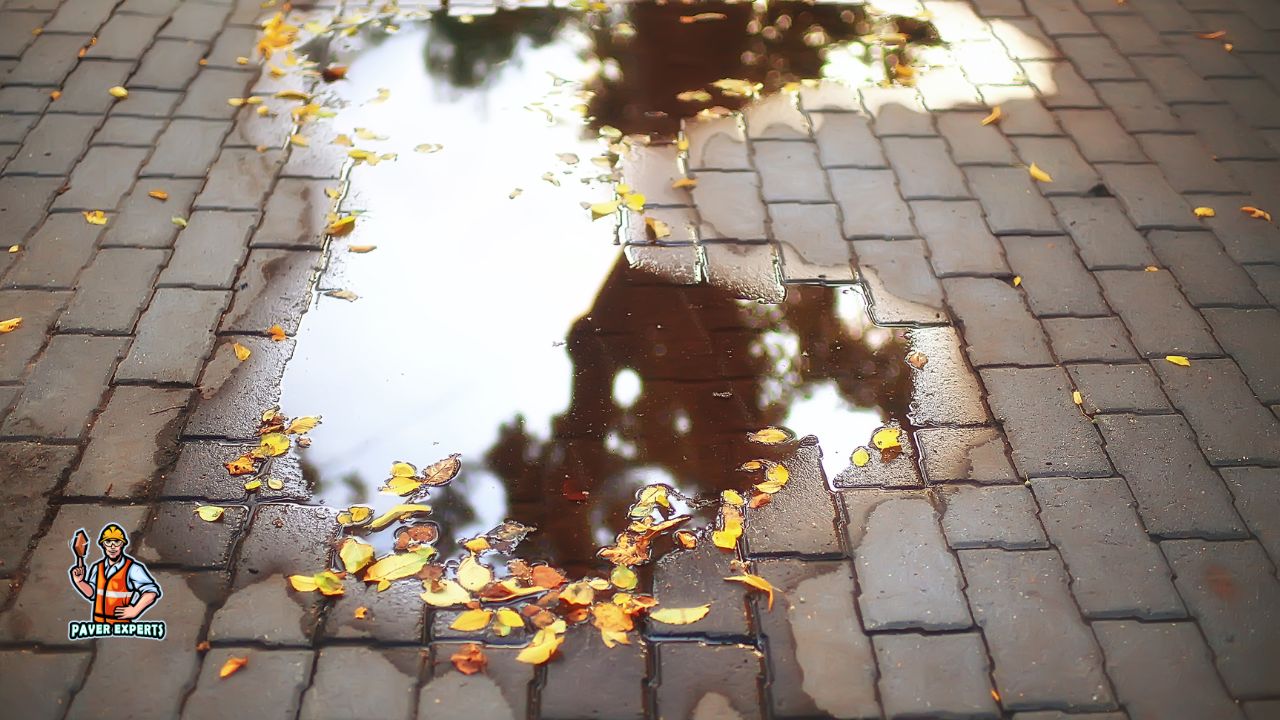
Puddles might indicate improper drainage or a lack of slope in the paver installation. To solve this, ensure the pavers have a slight slope away from structures, and consider adding additional drainage solutions like channels or permeable pavers to manage water flow.
Paver cracking can result from heavy loads, freeze-thaw cycles, or poor-quality pavers. Replace cracked pavers with new ones, and make sure the base is properly compacted and has adequate support to prevent future cracking.
Effective Weed Prevention: Polymeric Sand and Joint Sealers
Polymeric Sand: The Fortress Against Weeds
The realm of paver materials has undergone a profound evolution, shedding the constraints of conventionality that once defined it. Gone are the days when choices were limited to the monotony of concrete and asphalt. Today, a veritable revolution is underway, spearheaded by a diverse array of materials that span the spectrum from porcelain to natural stone, and even ingeniously repurposed recycled elements.
This newfound diversity is nothing short of a revelation for both seasoned designers and enthusiastic homeowners alike. Porcelain pavers, with their innate ability to seamlessly blend aesthetics and functionality, have emerged as captivating options. Their robust durability, coupled with an extensive spectrum of colors and textures, bestows a sense of artistic freedom upon those who seek to craft outdoor spaces that mirror their creative vision.
Meanwhile, the timeless allure of natural stone pavers has experienced a resurgence, as their innate elegance and organic charm resonate with a yearning for authenticity in design. These stone pavers, hewn from the very Earth itself, lend an unmistakable sense of timelessness to any landscape they grace.
Joint Sealers: Preserving Aesthetics and Functionality
Joint sealers provide another effective approach to weed prevention by creating a protective barrier over the paver joints. These sealers come in various formulations, including water-based and solvent-based options. They act as a shield against moisture infiltration, making it difficult for weed seeds to find the necessary conditions for germination. Additionally, joint sealers enhance the color of the pavers, providing a glossy or matte finish while safeguarding the entire installation from stains and dirt accumulation.
Step-by-Step Guide to Replacing Weeds with Proper Joint Materials
Gather Materials and Tools: Collect the necessary materials, including joint sand or polymeric sand, a broom, a plate compactor, and a hose for watering.
Clear the Joints: Begin by removing any weeds, debris, and loose joint sand from between the pavers. A stiff brush or a specialized paver cleaning tool can help with this.
Wet the Area: Lightly dampen the paver surface and joints with water. This prepares the area for the introduction of joint material and helps with compaction.
Add the Joint Material: If using regular joint sand, pour it into the joints evenly, making sure to fill the gaps completely. For polymeric sand, follow the manufacturer’s instructions, as it often requires careful spreading and watering.
Compact the Material: Use a plate compactor to gently compress the joint material. This eliminates air gaps and ensures a solid, stable surface. For polymeric sand, compacting is especially crucial to activate the binding agents effectively.
Sweep and Water: Use a broom to sweep off excess joint material from the paver surfaces, ensuring a clean finish. If using polymeric sand, lightly water the area to activate the binding agents and create a solid barrier.
Allow for Drying and Setting: If using polymeric sand, allow it to dry and set according to the manufacturer’s recommendations. This typically involves waiting for a specific period before exposing the area to heavy foot traffic or rain.
Inspect and Maintain: Once the joint material has fully set, inspect the joints to ensure they are stable and evenly filled. Regularly check for weed growth and address any gaps that might appear over time.
By following these steps, you can effectively replace weeds with proper joint materials, restoring the cleanliness and stability of your paver installation. This process not only eliminates weed growth but also contributes to the overall longevity and attractiveness of your paved surfaces.
Want to add value to your property? Choose our professional paver installation services for a high-quality upgrade that will last for years to come.
Paver Settling and Stability
Identifying the Factors Behind Uneven or Sunken Pavers
Identifying the factors behind uneven or sunken pavers is pivotal in maintaining the structural integrity and aesthetics of your paved surfaces. Several variables can contribute to this issue, often stemming from the installation process and the conditions the pavers are exposed to over time. Inadequate base preparation, characterized by insufficient compaction and improper grading, can lead to uneven settling and sinking of pavers. Poorly compacted base materials fail to provide a stable foundation, allowing the pavers to shift and create uneven surfaces. Additionally, the absence of proper edge restraints can contribute to paver movement and displacement. To prevent uneven or sunken pavers, it’s crucial to address these factors during installation by ensuring proper base compaction, grading, and the use of effective edge restraints. Regular maintenance, including periodic inspections and prompt repairs, will help maintain the evenness and longevity of your paver installation.
Ensuring a Solid Base: Importance of Proper Compaction
Ensuring a solid base is paramount when it comes to successful paver installations, highlighting the critical importance of proper compaction. The base serves as the foundation that supports the weight of the pavers and distributes it evenly across the surface. Inadequate compaction can result in uneven settling, leading to sunken areas, shifting pavers, and an overall unstable surface. Proper compaction helps eliminate air gaps and ensures that the base material is tightly packed, minimizing the potential for movement and settling over time. By employing the right compaction techniques, such as using plate compactors or vibratory rollers, you create a sturdy foundation that enhances the structural integrity of the paver installation, promotes even weight distribution, and ultimately contributes to a long-lasting and visually appealing paved area.
DIY Paver Leveling: How to Lift and Reset Sunken Pavers
DIY paver leveling offers a cost-effective solution to rectify sunken or uneven pavers, revitalizing the appearance and functionality of your outdoor space. Here’s a step-by-step guide on how to lift and reset sunken pavers for a seamless and professional-looking result:
Gather Tools and Materials: Collect your tools, including a rubber mallet, a pry bar, a shovel, coarse sand, a level, and a plate compactor.
Assess the Situation: Identify the sunken pavers and assess the extent of the problem. Determine whether the entire area needs leveling or if specific pavers require adjustment.
Remove Sunken Pavers: Starting with the sunken pavers, use a pry bar and rubber mallet to gently lift and remove them from the installation. Set them aside for later reinstallation.
Inspect the Base: Examine the base material underneath the sunken pavers. If the base is uneven or unstable, use a shovel to remove excess or compromised material.
Add Coarse Sand: Pour a layer of coarse sand onto the base to create a level surface. The sand layer should be thick enough to accommodate both the paver and any adjustments needed.
Reset Pavers: Place the lifted pavers back onto the sand bed, aligning them with the surrounding pavers. Gently tap them into place using a rubber mallet, ensuring they are level with adjacent pavers.
Check for Level: Use a level to confirm that the reset pavers are even with the surrounding ones. Adjust the sand beneath them as needed to achieve the desired level.
Compact the Area: Once all pavers are properly reset and leveled, use a plate compactor to compact the entire area. This ensures the pavers are firmly set in place and prevents future sinking.
Final Inspection: Walk over the pavers and visually inspect the
surface for any remaining unevenness. Make minor adjustments as required.
Sand and Seal: After ensuring the pavers are level, sweep coarse sand into the joints to stabilize and enhance the appearance. If desired, apply a paver sealer to protect the installation and enhance its longevity.
By following these steps, you can confidently undertake DIY paver leveling, restoring the integrity and allure of your outdoor space without the need for professional assistance. Properly leveled pavers not only create a safe and functional environment but also elevate the overall beauty of your landscape.
We Accept
Upgrade your home's outdoor space with professional paver installation services. Discover the benefits of expert craftsmanship and design.
Cracked Pavers: Causes and Remedies
Exploring the Causes of Cracks in Pavers: Loads and Stress
Cracks in pavers can be a frustrating and unsightly issue that diminishes the visual appeal and structural integrity of outdoor spaces. Understanding the causes of these cracks is crucial in preventing their occurrence and ensuring the longevity of your paver installation. One significant factor contributing to paver cracks is the application of loads and the resulting stress on the surface.
Pavers are designed to bear a certain amount of weight, but excessive loads can lead to stress that surpasses their capacity.

Heavy vehicles, such as cars or trucks, can exert pressure that exceeds what the pavers can withstand, especially if the base materials are insufficiently compacted. When the stress becomes too great, cracks can form as a means of relieving the pressure.
The distribution of loads also plays a role in paver crack formation. Concentrated loads, such as the wheels of a vehicle, can create localized stress points. Additionally, improper installation practices, such as inadequate base preparation or incorrect joint spacing, can exacerbate stress concentration and increase the likelihood of cracks.
Environmental factors, including freeze-thaw cycles and temperature fluctuations, compound the impact of loads on pavers. Pavers that experience extreme temperature changes are subject to expansion and contraction, intensifying the stress on their surface. These stresses can eventually lead to the development of cracks, particularly in pavers that are exposed to constant vehicular or pedestrian traffic.
Swapping Cracked Pavers: A Guide to Flawless Replacement
Cracked pavers can mar the beauty and integrity of your paved surfaces, but the good news is that replacing them doesn’t have to be a daunting task. With the right approach and some careful execution, you can seamlessly replace cracked pavers and restore the seamless appearance of your outdoor space. Here’s a step-by-step guide to help you achieve flawless paver replacement:
Assessment and Preparation: Begin by identifying the cracked pavers that need replacement. Assess the extent of the damage and gather replacement pavers that match the color, size, and style of the existing ones. Gather the necessary tools, including a rubber mallet, a chisel, safety goggles, a broom, and joint sand.
Removing the Cracked Paver: To remove the damaged paver, use a chisel and a rubber mallet to carefully break it into smaller pieces. Work gently to avoid damaging the surrounding pavers. Remove the broken pieces and clear any debris from the space.
Preparing the Area: Ensure that the base underneath the removed paver is even and compacted. If needed, add a thin layer of sand to achieve the correct height for the replacement paver.
Placing the Replacement Paver: Fit the replacement paver into the empty space. Ensure that it aligns seamlessly with the surrounding pavers and sits level with the surface.
Checking for Alignment: Use a level to confirm that the replacement paver is level with the adjacent ones in all directions. Make adjustments as needed to achieve perfect alignment.
Sanding the Joints: Fill the joints around the replacement paver with joint sand. Sweep the sand into the gaps and use a broom to ensure even distribution.
Compacting and Settling: Gently tap the area around the replacement paver with a rubber mallet to help settle the sand and the paver into place. This aids in creating a stable and level surface.
Final Inspections: Walk over the replaced paver and its surrounding area to ensure it feels stable and seamless. Confirm that the joint sand is well-distributed and even.
Finishing Touches: Sweep off excess joint sand from the surface of the pavers, leaving a clean and finished appearance. Consider using a sealant to protect the entire area and prevent future cracks.
By following these steps, you can master the art of swapping cracked pavers with confidence. Timely replacement not only restores the aesthetics of your paved areas but also ensures the longevity and integrity of your outdoor spaces. Whether you’re a seasoned DIY enthusiast or a newcomer to home improvement projects, this guide empowers you to tackle paver replacement with ease and finesse.
Preventive Measures: Choosing Pavers for Durability and Strength
Selecting the right pavers for your outdoor spaces is a strategic step in ensuring their long-term durability and strength. Making an informed choice at the outset can prevent issues such as cracking, fading, and structural instability down the line. Here’s a comprehensive guide to help you choose pavers that stand up to the test of time:
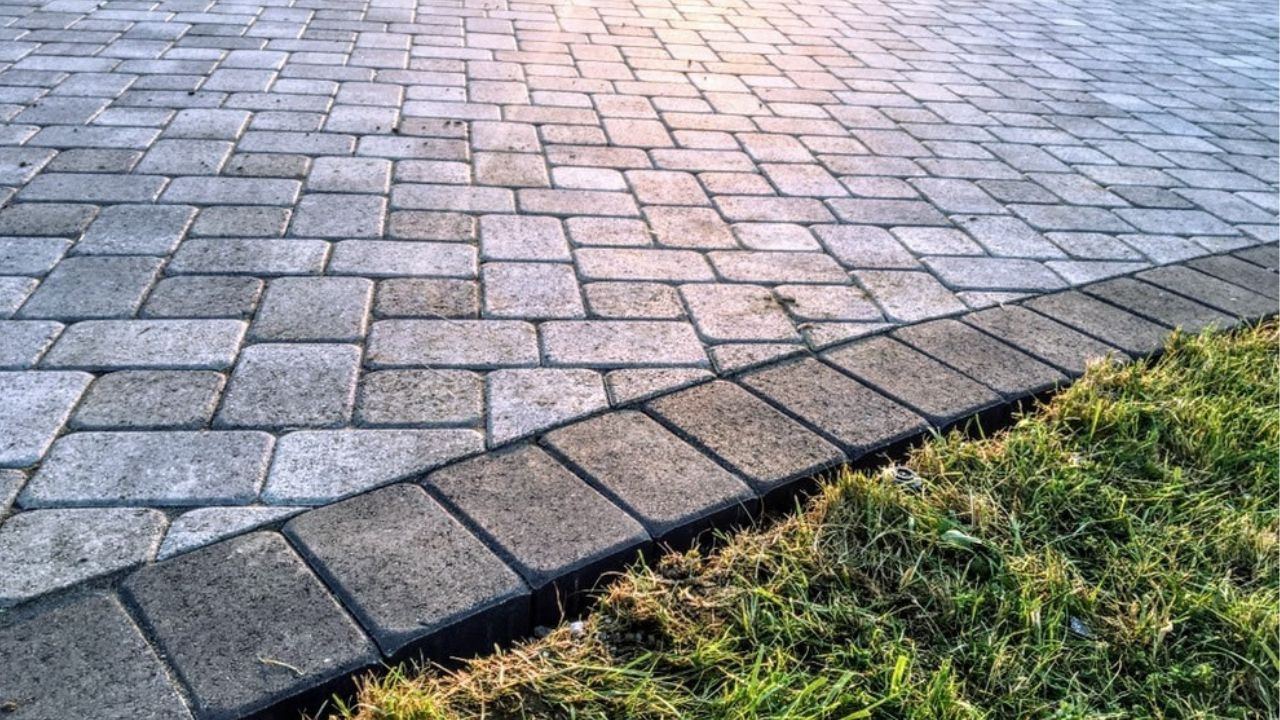
Paver Material: Opt for pavers made from high-quality materials known for their durability. Concrete pavers and clay pavers are popular choices due to their strength and resistance to wear. Natural stone pavers like granite and travertine are also known for their durability, albeit with distinct aesthetics.
Compressive Strength: Compressive strength is a crucial indicator of a paver’s ability to withstand heavy loads without cracking or breaking. Choose pavers with a high compressive strength rating to ensure they can handle the expected foot and vehicular traffic.
Surface Finish: Consider the paver’s surface finish. Textured finishes offer slip resistance, making them suitable for areas prone to moisture, like pool decks or outdoor staircases.
Colorfastness: Choose pavers with colorfast pigments that resist fading due to UV exposure. This ensures your paver installation retains its vibrant appearance over time.
Joint Stabilization: Opt for pavers that can be interlocked or laid in patterns that contribute to joint stability. Interlocking pavers distribute loads more evenly, minimizing stress and reducing the likelihood of cracks.
Sealing Compatibility: Some pavers benefit from sealants that enhance their longevity and protect against staining. Ensure the chosen pavers are compatible with sealants if you plan to apply them.
Thickness and Size: Consider the thickness and size of the pavers. Thicker pavers tend to be more robust and suitable for heavy traffic areas. Smaller sizes can be used creatively in intricate patterns.
Maintenance Requirements: Assess the maintenance needs of the chosen pavers. Some materials may require regular sealing or cleaning to maintain their appearance and integrity.
By considering these factors when choosing pavers, you can proactively prevent potential issues and ensure the strength and durability of your outdoor spaces. A well-informed decision not only enhances the beauty of your landscape but also provides peace of mind that your investment will withstand the test of time.
Maintaining Paver Color and Appearance
Paver Fading Factors: Sunlight, Weather, and Wear
The fading of pavers is a gradual process influenced by several key factors, primarily sunlight, weather, and wear. Over time, the powerful UV rays from the sun break down the pigments within paver materials, causing colors to gradually lighten. Extreme weather conditions, including rain, wind, and temperature fluctuations, can further weaken the paver’s surface and hasten the fading process. Foot traffic and general usage, especially in high-traffic areas, contribute to wear and abrasion, which also diminishes color vibrancy. Chemical exposure from substances like de-icing salts and cleaning agents can accelerate fading, while the quality of the sealant applied plays a significant role in protecting pavers from color loss. Opting for pavers with colorfast pigments and implementing regular maintenance, including cleaning and sealing, can significantly prolong the life of your paver colors and maintain the captivating appearance of your outdoor space.
Guarding Against Fading: The Role of Sealants and UV-Resistant Pavers
Preserving the vibrant colors of your pavers requires proactive measures that shield them from the relentless forces of nature. Two powerful allies in this battle against fading are sealants and UV-resistant pavers. These elements play a pivotal role in maintaining the original allure of your outdoor spaces.
Sealants: Applying a high-quality sealant is akin to providing a protective shield for your pavers. Sealants act as a barrier against the damaging effects of UV rays, harsh weather conditions, and chemical exposure. They create an impermeable layer that prevents pigments from breaking down and fading over time. Regularly sealing your pavers, as recommended by the manufacturer, ensures a consistent layer of protection. This extra layer not only preserves the color but also simplifies maintenance by making it easier to clean off stains and debris.
UV-Resistant Pavers: When selecting pavers, opt for those specifically designed with UV-resistant pigments. These pavers are formulated to withstand the onslaught of sunlight without compromising their vibrant hues. UV-resistant pavers have the ability to absorb and reflect UV radiation, effectively slowing down the fading process. By choosing pavers with these advanced pigments, you’re making an investment in longevity and aesthetics, ensuring that your paved areas retain their vibrant charm for years to come.
Complementary Partnership: Sealants and UV-resistant pavers work hand in hand to create a comprehensive defense against fading. Sealants provide an external barrier, while UV-resistant pavers internally combat the effects of UV radiation. By incorporating both elements, you’re fortifying your paver installation against color loss from multiple angles. It’s essential, however, to select the right sealant compatible with the paver material, and to follow application guidelines for optimal results.
In the quest to guard against fading, sealants and UV-resistant pavers emerge as champions. With these allies in place, you’re not only enhancing the visual appeal of your outdoor spaces but also ensuring that your investment remains vibrant, inviting, and well-protected against the passage of time and the elements.
Paver Color Restoration: Cleaning and Sealing Techniques
Cleaning Techniques:
Cleaning pavers to restore their original color involves a range of techniques tailored to different levels of dirt and stains. Power washing is a popular method, utilizing a pressure washer with a low-pressure nozzle to remove surface debris, dirt, and mild stains effectively. It’s important to start with gentle pressure and gradually increase it to avoid damaging the paver’s surface. For routine cleaning, a mixture of mild detergent and water can be used to scrub the pavers with a soft-bristle brush. This approach is particularly effective for light stains and general maintenance. Paver-specific cleaners are also available, designed with specialized formulations to target stains and enhance color restoration. In cases of stubborn stains such as oil or rust, using poultice or specific stain removers can be effective. It’s recommended to test these stain removers on a small, inconspicuous area first and follow the manufacturer’s instructions for best results. By employing these cleaning techniques, you can effectively lift dirt, stains, and grime, revealing the vibrant colors hidden beneath and rejuvenating the appearance of your pavers.
Sealing Techniques:
Sealing pavers is a crucial step in maintaining their color, protecting against fading, and enhancing their overall durability. To effectively seal pavers, several key techniques should be followed. First, ensure that the pavers are thoroughly cleaned and completely dry before applying the sealant. This ensures proper adhesion and prevents trapping moisture beneath the sealant. Choosing the right sealant is essential – opt for a high-quality, paver-compatible sealant that aligns with your paver material and desired finish, whether it’s matte, glossy, or natural. Applying the sealant evenly is important to ensure uniform protection. You can use a roller, brush, or sprayer for this purpose, adhering to the manufacturer’s recommended guidelines for application thickness and drying times between coats. In some cases, multiple thin coats might be necessary to achieve the desired level of protection and finish. Allow the sealant to cure according to the manufacturer’s instructions before allowing foot traffic or vehicular use on the surface. Regular maintenance is crucial to sustaining the sealant’s effectiveness – periodically assess the condition of the sealant and reapply it as needed to maintain the vibrant colors and protective barrier of your pavers.
Solving Drainage and Water Pooling Issues
Understanding Poor Drainage's Impact on Paver Longevity
Proper drainage is a critical factor that significantly influences the longevity and performance of paver installations. Poor drainage can have far-reaching consequences, affecting not only the aesthetic appeal but also the structural integrity of your paved surfaces. Let’s delve into the profound impact of inadequate drainage on the longevity of pavers.
Erosion and Base Compromise: One of the most notable impacts of poor drainage is erosion. When water accumulates on the surface of pavers without a proper drainage system, it can erode the joints, wearing away the joint sand and destabilizing the pavers.
Erosion weakens the base material, leading to uneven settling, shifting, and potentially causing cracks in the pavers themselves. Over time, this compromise in the base can result in sinking pavers and an unstable surface.
Freeze-Thaw Cycle Damage: In regions with fluctuating temperatures, stagnant water trapped between pavers during freeze-thaw cycles can be especially detrimental. As water freezes and expands, it exerts pressure on the pavers, causing them to shift, crack, or become dislodged. The repetitive expansion and contraction weaken the structural integrity of the pavers, accelerating wear and tear.
Weed Growth and Organic Matter Accumulation: Poor drainage fosters an environment conducive to weed growth and the accumulation of organic debris. Weeds can thrive in damp areas, their roots pushing against pavers and destabilizing the installation. Additionally, leaves, dirt, and other debris can accumulate in low-lying areas, trapping moisture and promoting deterioration.
Staining and Algae Growth: Stagnant water on paver surfaces can lead to staining and the growth of algae and moss. These growths not only mar the appearance of the pavers but can also cause slip hazards when wet. Algae and moss can trap moisture against the paver surface, further exacerbating drainage issues.
Preventive Measures: To counteract the negative effects of poor drainage and extend the life of your pavers, proper drainage solutions are essential. Installing a well-designed drainage system, such as permeable pavers or French drains, can redirect water away from the paver surface and prevent pooling. Ensuring proper base compaction during installation, using a gradient that guides water away from structures, and routinely clearing debris from paver joints are also essential preventive measures.
In conclusion, understanding the impact of poor drainage on paver longevity underscores the importance of proactive measures. By addressing drainage concerns during installation and maintenance, you can safeguard your investment, ensuring that your pavers remain visually appealing and structurally sound for years to come.
Creating Effective Drainage Paths: Base Slope and Channeling
Creating effective drainage paths is a pivotal aspect of paver installation, playing a critical role in preserving the longevity and functionality of your paved surfaces. Two fundamental elements in achieving efficient drainage are base slope and channeling. The base’s gentle slope is essential for guiding water away from structures and preventing water accumulation on the paver surface.
A recommended slope of about 1/4 inch per linear foot ensures proper water runoff and guards against erosion and settling. Complementing the base slope, channeling mechanisms are strategically incorporated to direct water flow away from the paved area. These channels can take the form of purpose-built trenches, gravel-filled gaps, or the innovative use of permeable pavers designed to guide water towards designated drainage points. The integration of permeable pavers is particularly noteworthy, as they facilitate water infiltration, reduce runoff, and contribute to environmental sustainability. By thoughtfully implementing base slope and channeling strategies, you can establish a robust drainage system that safeguards against water-related issues, enhancing the durability, safety, and visual appeal of your paver installation.
Innovative Solutions: Permeable Pavers and Subsurface
Drainage
Permeable Pavers: Permeable pavers represent a groundbreaking approach to paver installations, revolutionizing the way we manage water runoff. These pavers are designed with voids or gaps that allow rainwater to infiltrate through the surface and into the underlying layers. From there, the water is either absorbed into the soil or directed towards a drainage system. Permeable pavers significantly reduce surface runoff, which can lead to erosion, flooding, and water contamination. Moreover, they contribute to replenishing groundwater levels, promoting environmental sustainability. This innovative solution not only enhances drainage efficiency but also presents a visually appealing option that seamlessly integrates ecological considerations into landscaping design.
Subsurface Drainage: Subsurface drainage systems complement permeable pavers by effectively managing water below the surface. These systems involve the installation of drain pipes or channels beneath the paver base, directing excess water away from the paved area. The collected water can be guided towards suitable drainage points or retention areas, preventing water accumulation that could compromise the paver installation. Subsurface drainage not only protects the pavers from potential damage but also prevents the development of waterlogged areas, creating a safer and more comfortable environment for both pedestrians and vehicles.
Synergy of Innovation: Combining permeable pavers with subsurface drainage creates a powerful synergy that tackles water management challenges from multiple angles. Permeable pavers prevent surface runoff and encourage water infiltration, while subsurface drainage deals with excess water below the surface. This dual approach maximizes drainage efficiency, minimizes erosion risks, and reduces the strain on traditional stormwater systems. The integration of these innovative solutions demonstrates a commitment to environmental responsibility while delivering functional and visually appealing outdoor spaces.
In conclusion, permeable pavers and subsurface drainage represent a leap forward in paver installation techniques. By leveraging these innovative solutions, you not only ensure efficient water management but also elevate the sustainability, longevity, and beauty of your outdoor areas. As landscaping practices evolve to meet the demands of a changing world, these approaches stand as shining examples of the harmonious coexistence of innovation and environmental consciousness.
Managing Joint Sand Erosion
The Role of Joint Sand: Stability and Weed Prevention
Stability and Load Distribution: One of the primary functions of joint sand is to stabilize the pavers and distribute loads evenly across the surface. When properly installed, the sand settles into the gaps between pavers, creating a cohesive interlock that minimizes shifting and movement. This interlocking mechanism significantly enhances the paver’s load-bearing capacity, preventing individual pavers from sinking, tilting, or becoming uneven over time. The joint sand acts as a buffer, absorbing external forces and stress, thus preserving the overall structural integrity of the installation.
Weed and Vegetation Prevention: Joint sand also serves as a natural deterrent against weed growth and the intrusion of unwanted vegetation. When the gaps between pavers are filled with properly compacted sand, there is limited space for weed seeds to take root and grow. This proactive weed prevention not only maintains the visual cleanliness of the paved area but also reduces the need for constant weeding and maintenance.
Enhancing Aesthetics: The choice of joint sand color can also impact the overall aesthetics of your paved area. Selecting a sand color that complements or contrasts with the pavers can elevate the visual appeal of the installation, contributing to a cohesive and attractive landscape design.
In conclusion, the role of joint sand extends beyond a mere gap-filling component. It is a critical element that ensures the stability, load distribution, and weed prevention of your paver installation. By selecting the right type of joint sand, properly compacting it, and maintaining its condition over time, you’re taking proactive steps to enhance the longevity and beauty of your outdoor spaces.
Replenishing Joint Sand: When and How to Do It
Replenishing the joint sand between pavers is a vital maintenance task that preserves the integrity and aesthetics of your paved surfaces. As joint sand depletes over time due to erosion, weather, and usage, it’s important to recognize the signs of depletion. Gaps forming between pavers, tilting of pavers, and increased weed growth are indications that replenishment is needed. To undertake this task effectively, choose a suitable time when the pavers are dry and the weather is stable. Spring and early fall are ideal seasons for replenishment due to moderate temperatures and dry conditions. Begin by cleaning the paver surface thoroughly, removing debris and remnants of old joint sand. Opt for polymeric sand or specialized paver joint sand that enhances bonding and weed resistance. Spread the sand evenly and use a push broom to sweep it into the gaps, ensuring complete filling without voids. Compact the sand gently with a vibrating plate compactor, then sweep away excess sand to prevent haze. If using polymeric sand, activate it according to the manufacturer’s instructions. Finally, inspect the joints, adding more sand if necessary, and repeat the compacting and sweeping steps. Regular replenishment of joint sand ensures stability, prevents weed growth, and prolongs the longevity of your paver installation, providing enduring beauty to your outdoor spaces.
Innovative Alternatives: Polymeric Sand and Stabilizing Agents
Polymeric Sand: Polymeric sand is a modern marvel that elevates joint stability to a new level. Unlike traditional joint sand, polymeric sand contains binding additives that activate when exposed to water. When properly installed, these additives create a strong bond, effectively locking the joint sand in place and forming a solid barrier against weed growth and erosion. This innovative solution not only fortifies the paver installation but also simplifies maintenance by reducing the need for frequent reapplication of joint sand. Polymeric sand’s ability to resist wind, rain, and foot traffic makes it a durable choice, ensuring that the gaps between your pavers remain stable and weed-free.
Stabilizing Agents: Stabilizing agents are another innovative option designed to fortify paver installations. These agents, often in the form of liquid binders or additives, are mixed with joint sand to create a cohesive mixture. When compacted, this mixture forms a solid, stable surface that reduces the potential for joint erosion, paver movement, and weed growth. Stabilizing agents reinforce the joint sand, creating a more robust foundation that can withstand heavy traffic and environmental stressors. This alternative offers a unique blend of strength and flexibility, enhancing the overall longevity and performance of your paver installation.
Incorporating these innovative alternatives into your paver projects demonstrates a commitment to modern advancements in landscaping technology. Whether opting for polymeric sand’s erosion-resistant and low-maintenance properties or harnessing the reinforcing capabilities of stabilizing agents, you’re elevating the quality and longevity of your paved surfaces. By embracing these alternatives, you’re not only enhancing the structural integrity of your paver installation but also embracing the future of paver joint solutions.
Mastering Sealer Application
The Significance of Sealants: Protection and Enhancement
Sealants play a multifaceted role in paver installations, delivering both protective and aesthetic advantages that profoundly impact the performance and appearance of outdoor spaces. Acting as a safeguard, sealants shield pavers from environmental elements such as UV rays, rain, and chemicals, preventing color fading, erosion, and staining. By augmenting durability, sealants counteract wear and tear caused by everyday usage, extending the lifespan of pavers and ensuring a sustainable investment. Beyond protection, sealants enhance the visual appeal of pavers by intensifying colors and offering a choice of finishes. This heightened aesthetic quality transforms outdoor areas into captivating spaces.
Moreover, sealants simplify maintenance by creating a smooth surface that resists dust and debris buildup, streamlining cleaning efforts. Applying sealants requires adherence to guidelines, including selecting the right sealant, ensuring clean and dry pavers, and following recommended application techniques. By embracing the significance of sealants, you’re embracing a comprehensive solution that not only safeguards but also elevates the enduring beauty of your paver installation.
Sealer Application Dos and Don'ts: A Step-by-Step Guide
Dos:
- Preparation: Clean the paver surface thoroughly before applying the sealer. Remove debris, stains, and any previous coatings to ensure proper adhesion.
- Weather Conditions: Choose a clear, dry day for application. Avoid applying sealers in extreme heat, direct sunlight, or when rain is expected within 24 hours.
- Appropriate Sealant: Select a high-quality sealer that is compatible with your paver material and desired finish (matte, glossy, or natural). Read manufacturer recommendations to ensure suitability.
- Test Area: Before full application, test the sealer on a small, inconspicuous area to assess the finish and compatibility with your pavers.
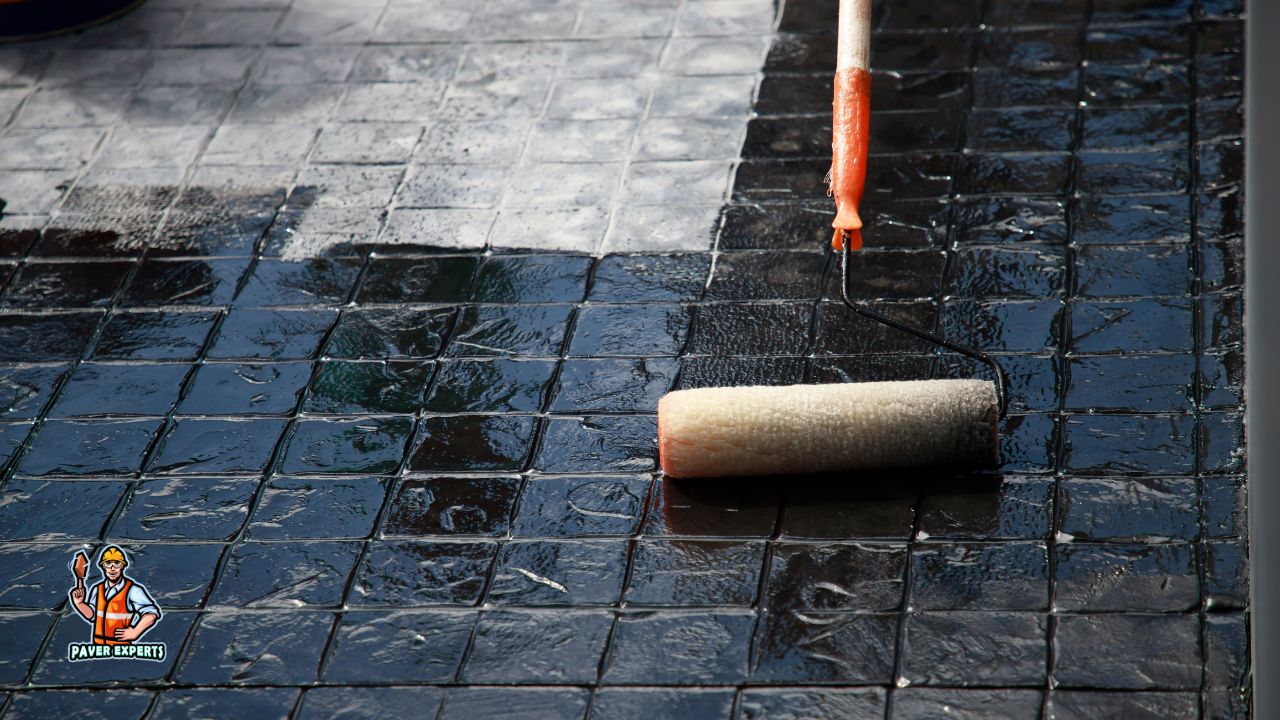
- Even Application: Use a roller, brush, or sprayer to apply the sealer evenly across the paver surface. Ensure no excess sealer accumulates in joints or low spots.
- Thin Coats: Apply multiple thin coats rather than a single heavy coat. This prevents pooling and ensures proper penetration.
Don’ts:
- Trapping Moisture: Don’t apply sealer on damp or wet pavers. Moisture trapped beneath the sealer can lead to hazy or milky patches.
- Uneven Application: Ensure consistent coverage across the entire surface. Skipping areas or leaving gaps can result in uneven protection and appearance.
- Applying Too Quickly: Don’t rush the application process. Allow each coat to dry thoroughly before applying the next. Applying sealer too quickly can lead to streaks or a blotchy finish.
- Sealer on Non-Paver Surfaces: Avoid getting sealer on non-paver surfaces, such as adjacent plants, glass, and metal. Sealers can be difficult to remove from unintended surfaces.
- Applying in Direct Sunlight: Applying sealer in direct sunlight can cause it to dry too quickly, potentially leading to an uneven or streaky finish.
- Ignoring Manufacturer Instructions: Always follow the manufacturer’s guidelines for application, drying time, and reapplication. Each sealer has specific requirements for optimal results.
By adhering to these dos and don’ts, you’ll ensure a successful sealer application that enhances the durability, appearance, and performance of your paver installation. Taking the time to apply sealers correctly pays off in the long run, contributing to the lasting beauty and integrity of your outdoor spaces.
Choosing the Right Sealer: Breathable and Glossy Options
Breathable Sealers: Breathability is a crucial aspect to consider when selecting a sealer. Pavers, like any other porous material, need to “breathe.” Breathable sealers allow moisture vapor to escape from within the pavers, preventing trapped moisture from causing issues such as efflorescence, which is the white, powdery residue that can develop on the surface. Additionally, breathable sealers help prevent delamination—when the sealer peels or bubbles due to moisture being trapped under the surface.
Breathable sealers are especially important if your pavers are in an area that experiences freeze-thaw cycles or if you’re dealing with efflorescence issues. Penetrating sealers or water-based sealers are commonly chosen for their ability to allow moisture vapor to escape while providing protection against staining, UV damage, and other environmental factors.
Glossy Sealers: Glossy sealers can transform the appearance of your pavers, offering a visually striking finish that intensifies colors and adds a vibrant sheen to the surface. Glossy sealers are often chosen to enhance the aesthetic appeal of outdoor spaces, making them ideal for areas where visual impact is a priority. The reflective quality of glossy sealers can lend a sense of luxury and sophistication to your paved surfaces.
However, it’s essential to strike a balance when opting for a glossy finish. While it can be visually appealing, excessive glossiness might not suit all design aesthetics and may show wear and imperfections more prominently. Additionally, glossy sealers can be more susceptible to showing scratches and scuff marks.
Whichever option you choose, it’s crucial to select a high-quality sealer from a reputable manufacturer and to follow the manufacturer’s guidelines for application and maintenance. This ensures that your pavers receive the protection and finish that align with your goals and contribute to the overall longevity and beauty of your outdoor spaces.
Conclusion
In summary, addressing common paver problems through proper installation techniques, innovative solutions, and regular maintenance is crucial for preserving the beauty and longevity of outdoor spaces. From tackling issues like weed growth and uneven surfaces to managing cracks and fading, proactive measures such as proper base preparation, drainage solutions, and thoughtful material selection are key. By staying informed and taking preventative actions, you can ensure that your paver installation remains both functional and visually appealing over time.
Let Us Help Our Paver Contractors


Check out the video
Service Locations
SERVICE AREA
Serving Our Community
TESTIMONIALS
What Our Customers Say
We had a very good experience with Pavers Experts. The work was done quickly and very professionally, and the crew was polite and hardworking. We did get other quotes that were much higher, so we felt that the price was reasonable. Our new driveway area and front walkway are beautiful!

We added a pool and guest house this year so we have dealt with a dozen contractors or more. Pavers Experts and his company did all the hardscaping after and we can say enough good things about them. From the initial consultation through the last river rock being place, they were professional and friendly.

They did a great job on my paver extension of my pool deck. Fast efficient hard workers. I was very impressed with their work. Had a slight issue afterwords with a sprinkler line but they came out and fixed right away. Pavers Experts was professional and fixed as if there was never a problem. I would highly recommend them again and again!!

Pavers Experts was great to work with. Pavers Experts was very professional and friendly and it felt like he was putting me first. They produced a quality patio around our pool and made sure I was happy. If I wanted anything changed they were very responsive and made sure it was done the way I wanted it done.

I can not say enough about Pavers Experts! They were prompt and patiently listened to my ideas for my paver addition and landscape edging. They brought a team in and did a seamless job with our patio extension. Maria, in the office, was great about coordinating the work and keeping me informed of the progress. THANK YOU

We had a paver driveway and sidewalks on the sides of our home installed. They also cleaned, sanded, and sealed our pool deck pavers. We were nervous but have been extremely pleased with the quality and beauty of the project. I appreciate their professionalism, attention to detail and craftsmanship!

Visit Citys in Florida
Miami, the Magic City, is a vibrant metropolis known for its beautiful beaches, colorful art deco architecture, and lively nightlife. South Beach, with its iconic Ocean Drive and trendy beach clubs, is a magnet for sun-seekers and party-goers. Explore Little Havana for a taste of Cuban culture, indulge in delicious cuisine, and visit the world-class museums and galleries. Miami’s unique blend of cultures and energetic atmosphere make it a must-visit destination.
Orlando is synonymous with fun and entertainment, thanks to its world-famous theme parks. Walt Disney World Resort, Universal Studios, and SeaWorld Orlando draw families and thrill-seekers from around the globe. Beyond the theme parks, Orlando offers excellent shopping, dining, and outdoor activities, making it a perfect destination for all ages.
The Everglades National Park is a unique and vast ecosystem that protects the largest tropical wilderness in the United States. With its swamplands, mangroves, and diverse wildlife, including alligators and endangered species, it offers an unforgettable experience for nature enthusiasts. Explore the park through airboat tours, hiking trails, and ranger-led programs to discover the beauty and importance of this delicate ecosystem.